Creating a CRUD App with FastAPI (Part one)
Creating a CRUD web API could be as hard as a nut or as easy as your first hello world app in a new languange. Building a web app with FastAPI is one way around the tussle.
Introduction
FastAPI is one of Python’s popular web framework.. FastAPI is popular mostly because it comes battery included with awesome tooling such as for it’s speed(due being based on Starlette, using ASGI), easy type hint for validation, easy serialization and amazingly two API documentation providers.
Learning FastAPI, it’s expected that you should be familiar with Python (cause it could be strenuous to pick up but would get easy along the way with basic python knowledge) and using the Terminal. Knowledge of Django or Flask will be a plus although not necessary.
In this series we will be creating a MiniTwitter site, it’s going to have basic features like users, followers, and posts, and CRUD functionality on posts and users. CRUD stands for Create, Read, Update and Delete. Those are basic actions performed on most sites especially social media sites.
First Steps
Let’s get started, first you create a directory named minitwitter and change to the directory, create a virtual environment for FastAPI and install FastAPI and Uvicorn.
On windows:
mkdir minitwitter
cd minitwitter
mkvirtualenv fast-api
pip install fastapi uvicorn, mysql-pythonNote: if mysql-python doesn’t install
pip install pymysqlFast-api comes with fastapi-sqlalchemy and pydantic when trying to install. If it doesn’t, try installing them individually via `pip`
FastAPI doesn’t have it’s server like Django and Flask, so Uvicorn is an ASGI server which will be used for production and serving of a FastAPI
Running First Program
Let’s run our first app create file, main.py inside minitwitter using your favourite IDE , write this:
from fastapi import FASTAPI takes the FastAPI class from the package, which is used in app = FASTAPI() for initializing app as an instance of the class.
app.get("/") performs a get function on the app. Using the HTTP:// method
async def root()is a basic function that returns a dict/ json return {"message:"Hello World"}
On the terminal, run:
uvicorn main:app --reloadmain refers to the main.py file and app refers to the instance app in the file. --reload tells the server to update after changes in the files(this is only recommended for development)
Your app is hosted locally on http://127.0.0.1:8000/
FastAPI provides you with an API interactive docs which you can use when creating your API, you can use either the http://127.0.0.1:8000/docs or http://127.0.0.1:8000/redocs.
Alembic Setup
Now let’s start building the model for our minitwitter, first we install Alembic. Alembic is a migration tool used in python for connecting sqlachemly classes as models on a database. To install and run alembic run these commands:
pip install alembic
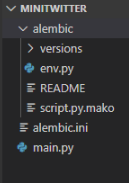
alembic init alembicalembic init alembic creates a alembic.ini file and an alembic folder in your project directory, your directory should look like this:
To build a database we will use MySQL as it is easy to use. You can install mysql(link)If you have MySQL running go and run MySQL command line and create a database
CREATE DATABASE minitwitter;
Creating for production we will be connecting to the database in an .env file that won’t be uploaded on Github or Docker. Create a .env file, pip install python-dotenv python-dotenv is a package used in reading .env files
Go to the alembic.ini file and edit line 26
sqlalchemy.url = driver://user:pass@localhost/dbname
delete the example link;
sqlalchemy.url =
In the .env file, edit it to
SQLALCHEMY_DATABASE_URI =mysql://root:root@localhost/minitwitter
if mysql-python had refused to install, run this instead,
SQLALCHEMY_DATABASE_URI=‘mysql+pymysql://root:root@localhost/minitwitter’
Note we are following the above sqlalchemy.url example and can edit your personal username and password.
Create a model.py file in your base directory.
Open the alembic\env.py file, add this line of code after line 6.
this is used to access the base directory of your project, and load the .env file. Then after line 17, write
config.set_main_option(“sqlalchemy.url”, os.environ[“SQLALCHEMY_DATABASE_URI”])This code is to overwrite the sqlachemy url in the alembic.ini file.
After line 29
# add your model’s MetaData object here
# for ‘autogenerate’ support
# from myapp import mymodel
# target_metadata = mymodel.Base.metadata
Import the model.py file and overwrite target_metadata
This is to enable detection of models and auto-generation into a migration file by alembic
Modelling and First Migration
Let’s edit model.py
Let’s make our first migration. On the terminal, run:
alembic revision --autogenerate -m “create user table”
alembic upgrade head
alembic revision --autogenerate -m "create user table" creates a migration file, without --autogenerate the models.py isn't detected for the migration file. alembic upgrade head upgrades to the database changes in the migration file.
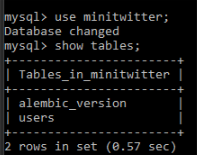
To check if our migration was correct, On MySQL terminal, run:
minitwitter;
show tables;
You should see something like this:
Adding Data to Database
To be able to add data to our database we will need a pydantic schema of each model that helps in serializing and deserializing models into JSON objects to be read by the browser and database. Create a schema.py file in the base of our project. In schema.py, write;
The UserBase class is a class on which other users class like UserCreate and User is based on, UserCreate is used for validation and sending data to the server, while User to send values and rows from the database.
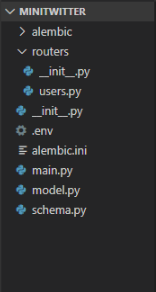
Create a folder routers folder in our project directory, add the following files, __init__.py, and users.py in our project directory create a __init__.py file also. Your directory should be looking like this:
Building with production in mind, it is necessary that the password are hashed so they can’t be read. To hash our password and also read hashed password for validation, we will need to use the bcrypt library.
In routers\user.py add the following lines;
Here, we imported bcrypt for hashing our password, APIRouter to creates route outside our app instance in main.py and connect to it(similar to blueprints in Flask) and db to commit our user to the database. Also we imported the User model and the UserCreate schema for taking in our values and validating it respectively, while Users from schema.py to send user’s info back.
router = APIRouter creates an instance.
/register takes in values from SchemaUser in def create_user(user: SchemaUser) hashes the password, passes the value to the ModelUser and sends it to the database, refreshes the User values and returns back User with the Users schema.
Now, edit your main.py file to look like this:
Now let’s run the server again, then go to http://127.0.0.1:8000/docs
It should look like this:
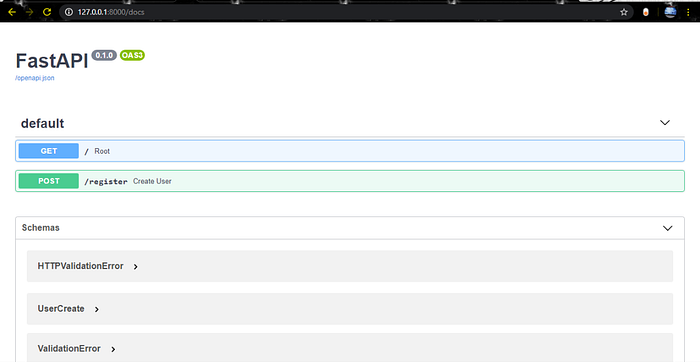
Here you can see the two routes created on our app, / and /register and their methods. click on the POST method on user, click on Try it out and fill in the values and Execute. You can try it multiple times to create different users.
In the next part, we will be creating user authentication, follow function and more.
You can locate the repo here. You can also reach out via the comment session or on send a message on Twitter
